
Most people who use Gmail love it, and for good reason. It has a clean user interface, it does an amazing job keeping spam at bay, and the mobile app is pretty great as well. But beyond all that, there are a collection of tools and add-ons at your disposal that lay just out of sight – hidden treasures if you will. These can be accessed through your Gmail settings, and in this blog post I’m going to show you the five add-ons I have found most beneficial, and how you can access them and start putting them to good use.
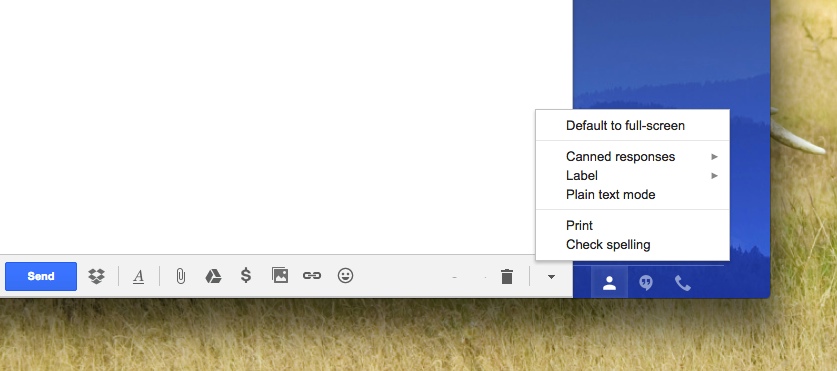
1) Canned Responses.
Ever find yourself typing the same paragraph to different people over and over again? With Canned Responses, you’ll only need to type that paragraph once. The Canned Responses feature needs to be activated through something called Gmail Labs in your settings. Here’s how to get there: from the main Gmail view, click the gear shifter icon in the upper right corner of your inbox and then click on Settings. From the settings screen, you should see a number of tabs at the top – one of them is “Labs.” Click on it, and you’ll see a list of all the labs available to you. If you scroll down you’ll find one titled Canned Responses. Check the circle next to “Enable” and click “Save Changes” at the bottom of this screen. Gmail will then reload so you can begin using your newly activated feature. To see how Canned Responses works, first click the compose button to start a new email. Type some text and then click the small downward arrow in the lower right corner of the compose box. Select the option called “Canned Responses” and then select “New Canned Response.” After you give your response a name and save it, this response will be available for future use. To use your canned response later on, navigate back to the Canned Responses menu and you’ll see the title of the canned response you created. Select it, and you’ll see that block of text appear in your email wherever your cursor was. An amazing time saver.
2) Calendar in Sidebar.
If you’re a Google calendar user, you just might love this. If you find that when someone emails you asking about your availability on a certain date, you open up a new window to navigate to Google calendar – now you can view your calendar right from within Gmail. 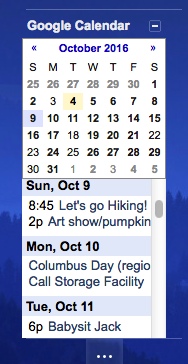 To activate this feature, head back to the Settings –> Labs (see directions above) and enable the lab entitled “Google Calendar Gadget.” Remember to click “save changes” at the bottom of that screen after you do so. You’ll now see a widget titled “Google Calendar” in your Gmail sidebar which you can drag up or down to position it where you want it. Toggle it open or close by clicking the plus/minus sign. If you want to be able to see the month view on top of the running list (see photo), click the little link that says “options” in the lower right corner of the widget and check the box that says “show mini calendar.” I’ve found this widget to be helpful in quickly knowing if I can make it to an event without having to open a new browser window.
3) Send and Archive Button.
This feature is particularly useful if you’re a “zero inbox” person like I am. If you’re not a person who keeps their inbox empty but would like to be, I suggest you head over to my previous blog post, How to Keep a Zero Inbox. The Send and Archive Button can be activated in Settings –> General. Scroll down and you’ll see a section titled “Send and Archive.” By default, the option that’s selected is “Hide Send & Archive button in reply.” Check the one that says “Show” instead and you’ll be in business. As always, don’t forget to save your settings after you make any changes. Now when you’re replying to an email that’s in your inbox, you’ll see two buttons where your “Send” button used to be. The first is for you to send and archive this email in a single step, and the second is for you to send normally without archiving. Since I leave nothing in my inbox after replying to messages, I’ve found this feature extremely helpful. Now if only there were a “Send and Delete” button as well…

4) Undo Send.
To be honest, I use the Undo Send Button more often than I thought I would when I first activated this feature. To get it for yourself, head on over to Settings –> General and check the “Enable Undo Send” box. You can set your send cancellation period to 5, 10, 20, or 30 seconds (I have mine set to 30). It might seem silly, but the next time you hit send and then immediately afterward spot a typo (or worse, realize you’ve sent your message to the wrong person), you’re going to be thankful to be able to undo what you’ve done.

5) Themes.
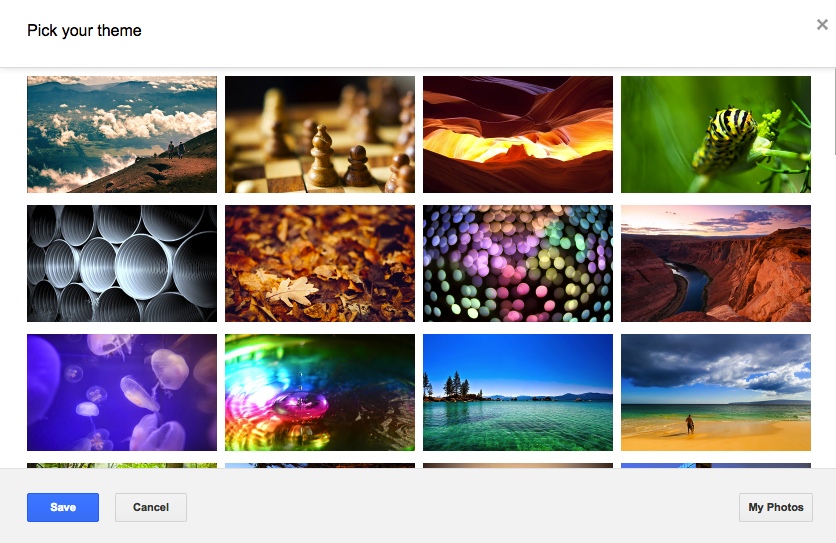
Perhaps most fun of all is getting to choose the backdrop for your Gmail interface. Access Gmail’s themes from Settings –> Themes. There you’ll find dozens of pre-made themes to choose from, or you can also opt to upload your own photo from your computer as a background. Looking for more cool background photos? You can find oodles of them online – I recommend googling “desktop backgrounds” and seeing what you find.
I hope you’ll enjoy these “treasures” of Gmail as much as I do. As always, if you’ve enjoyed what you read today, feel free to leave me a comment below!